So, you’re ready to close up your above ground pool for the winter. While putting your pool to bed for the winter may not bring a smile to your face, closing your pool the right way will make a huge difference when it comes time to open it in the spring.
We’ve broken down winterizing your pool step-by-step so you can do it yourself confidently. To get even more familiar with the process, watch the essential product video below, scroll to the end to download our checklist and PDF guide for later, and check out our Pool Closing School dates.
Prefer to leave it to the professionals? No problem! We have you covered. Call the Service Department at 616-896-1717, or request pool closing services online.
When to Close Your Pool
In Michigan, late October and early November are not too late to close your pool. As long as your water’s moving, it’s not going to freeze, so you’ll be okay grabbing every last second of pool use you can.
Before You Begin
There are a couple of things you need to do before closing your pool.
Check for Leaks
Even a small pinhole leak will drain your entire pool over the winter. A simple way to check for leaks is mark the water line with a piece of tape. Keep track of it for a few days. If you’re losing water, a good first place to check for leaks is under your steps or ladder. Pebbles can get in there and occasionally get pushed through. Otherwise, check the bottom of the pool for dark spots.
Test the Water Balance
Water balance is as important over the winter as it is during the summer. If your water balance is off, the acidity can be extremely rough on your liner. Your pool liner will last a long time if you take care of it, so make sure your water is in perfect balance before it sits unused during the winter.
Check the Water Temperature
Make sure your water temperature is in the low 60s before you close the pool. At those temperatures, algae becomes a lot less active and less aggressive. When you close your pool, the water should be clean and clear. If you close the pool green, you’ll open the pool green — you don’t want that.
Vacuum the Pool and Remove Debris
A little dirt in the bottom of the pool isn’t going to hurt you, but make sure you get any leaves, sticks, debris, and other big stuff like that out of there before winter. If you leave a leaf on the bottom of the pool, it’ll leave an imprint, and that’s probably not a design element you’re going for.
How to Close Your Above Ground Pool for Winter
1. Repair all leaks.
Covering a pool that has a leak could result in irreparable damage to the liner.
2. Balance chemicals.
Unbalanced pool water becomes very corrosive at low temperatures, damaging pool surfaces and equipment. Bring a water sample to your preferred Zagers location 2 weeks before closing so an accurate analysis can be done.
For best results, wait to close your pool until the water temperature is around 60 degrees Fahrenheit.
3. Brush, vacuum, and clean.
Thoroughly clean the waterline and all pool surfaces with BioGuard Off the Wall to help prevent permanent discoloration.
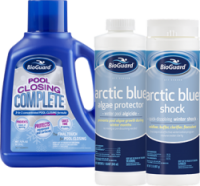
4. Add Zagers’ Winter Kit.
STEP 1: Add BioGuard Arctic Blue Shock to oxidize the water. Circulate for approximately 1 hour.
STEP 2: Add BioGuard Arctic Blue Algae Protector directly to the water around the edge of the pool.
STEP 3: Add BioGuard Pool Closing Complete to protect pool surfaces during the cold weather months with anti-corrosion and anti-scale properties.
After steps 2 and 3, circulate the water for approximately 2 hours.
5. Lower the water level.
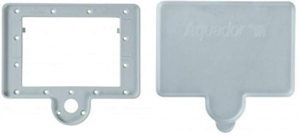
If you are using an Aquador, the water level only needs to be reduced to the lower of the two waterline marks on the skimmer faceplate.
If an Aquador is not being used, the water level must be lowered several inches below the skimmer and return openings using a siphon or submersible pump.
6. Remove accessories.
Any of these items: ladders or stairs, automatic vacuum, the skimmer weir, flow control flap, skimmer basket—and any other item in the pool—should be removed and stored.
7. Put on the Aquador.
Snap the Aquador onto the faceplate of your skimmer. Press around the edges carefully to ensure that it is on tight. Using a small amount of Lube Tube may also be beneficial to secure the seal.
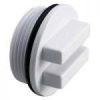
8. Place winter disc or plug in the return.
For Doughboy pools: Take off the return faceplate that holds in the eyeball. Take out the eyeball and insert the winter disc. Thread the faceplate back on to hold the disc in place.
For all other brand pools: Take off the return jet/eyeball and insert a winter plug sized for your pool.
For pools with lights in the return: Take out the light bulb and replace with a #9 rubber winter plug.
9. Disconnect & drain the filter, pump, and chlorinator.
Sand Filters: Pour or pump out sand, clean the tank, and store the filter inside.
D.E. & Cartridge Filters: Drain and clean the filter. Remove the cartridge or grids and clean thoroughly with Kleen It to remove grease, oil, and scale. Store all equipment inside.
Sanitation Feeder/Chlorinator: Disconnect hoses and remove extra chlorine tabs. Discard the mineral pack, as you will need a new pack in the spring.
PRO TIPS:
- Place all plugs in the pump basket so they are easy to find in the spring.
- Always refer to your owner’s manuals for winterizing instructions.
10. Winterize the heater.
See your owner’s manual for information on winterizing.
11. Clean the solar cover.
Thoroughly clean the solar cover with BioGuard Stow-Away and store in a clean, dry place.
PRO TIP:
- If you store the solar color in a barn or shed, add dryer sheets around the cover to keep mice away.
12. Protect pool chemicals.
Store pool chemicals in a cool, dry place where they won’t freeze. Store away from any volatile materials.
How to Cover Your Above Ground Pool for Winter
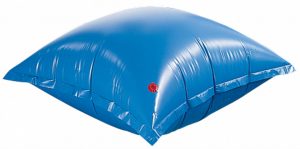
1. Tie off air pillow(s) or affix a Pool Pillow Pal.
For round pools, tie the air pillow(s) in the center of the pool, and for oval pools tie one air pillow at each end.
Do not fully inflate the pillows—only fill them about 2/3 full of air. The air pillows should be tied loosely so they do not pull tight on the sides of the pool.
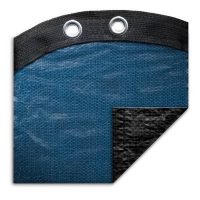
2. Position Cover.
The cover should lay on the water, black side down, positioned evenly on all sides. Tighten the cable to draw the cover into its final position.
3. Add Water Tubes.
Add water tubes on top of the cover to hold it down and prevent it from lifting in the wind. Adding this weight is important because pool cover warranties do not cover wind damage.

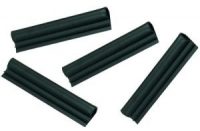
4. Secure Cover with Cover Clips/Locs.
For pools in high wind areas, the use of cover clips/locs may also be needed. These securely attach the cover to the top rails of the pool so that wind can’t get under the cover and flap it around.
5. Position Leaf Net.*
The leaf net should lay on top of the winter cover and be positioned evenly on all sides.
*Leaf nets should be removed, and leaves discarded, before the first snowfall.
PRO TIPS
- Check the cover periodically for areas of stress, especially near grommets and loops. You may need to siphon or pump off some water if it gets too heavy.
- Do not hang weight from the cables (e.g., milk jugs), as it may damage the cover.